
| 일 | 월 | 화 | 수 | 목 | 금 | 토 |
|---|---|---|---|---|---|---|
| 1 | 2 | 3 | 4 | |||
| 5 | 6 | 7 | 8 | 9 | 10 | 11 |
| 12 | 13 | 14 | 15 | 16 | 17 | 18 |
| 19 | 20 | 21 | 22 | 23 | 24 | 25 |
| 26 | 27 | 28 | 29 | 30 |
- txt 저장
- button 태그
- C언어
- 스코어 출력
- 한글 변환기
- 계산기 코딩
- table 디자인
- 영어 변환
- textarea 태그
- video 태그 속성
- 주사위 코딩
- pre 태그
- download 속성
- summary 태그
- button type 속성
- meter 태그
- 스코어 저장
- datalist 태그
- thead 태그
- input type 속성
- progress 태그
- 글자 스타일 태그
- time 태그
- document.write()
- audio 태그 속성
- tbody 태그
- HTML
- css 적용 방법
- details 태그
- border
- Today
- Total
김용재
JS) 22/05/02)이벤트리스너, document.write, function 본문
<!DOCTYPE html>
<html>
<head>
    <meta charset='utf-8'>
    <meta name='viewport' content='width=device-width, initial-scale=1'>
    <title>HTML 태그의 이벤트리스너 속성에 자바스크립트 코드 작성</title>
</head>
<body>
    <img src="imgs/apple01.jpg" alt=""
    onclick="this.src='imgs/banana.jpg'"
    onmouseout="this.src='imgs/apple01.jpg'"
    onmouseover="this.src='imgs/applemango.jpg'" width="200" height="180">
</body>
</html>
1. 이벤트 리스너 속성에 자바스크립트 코드 작성
이벤트 리스너 = 'onclick', 'onmouseout', 'onmouseover'
<!DOCTYPE html>
<html>
<head>
    <meta charset='utf-8'>
    <meta name='viewport' content='width=device-width, initial-scale=1'>
    <title>script 태그에 자바스크립트 코드 작성</title>
    <script>
        function click1(obj){
            obj.src='imgs/banana.jpg'
        }
        function out(obj){
            obj.src='imgs/apple01.jpg'
        }
        function over(obj){
            obj.src='imgs/applemango.jpg'
        }
    </script>
</head>
<body>
    <img src="imgs/apple01.jpg" alt="" width="200" height="180" onclick="click1(this)" onmouseout="out(this)" onmouseover="over(this)">
</body>
</html>
2. script 태그에 자바스크립트 코드 작성
<script>
function click1(obj){
obj.src='imgs/banana.jpg'
}
function out(obj){
obj.src='imgs/apple01.jpg'
}
function over(obj){
obj.src='imgs/applemango.jpg'
}
</script>
함수 제작을 통해
img 태그 속 이벤트 리스너에 함수 삽입
<!DOCTYPE html>
<html>
<head>
    <meta charset='utf-8'>
    <meta name='viewport' content='width=device-width, initial-scale=1'>
    <title>script 파일 불러오기</title>
    <script src="js/lib.js"></script>
</head>
<body>
    <img src="imgs/apple01.jpg" alt="" width="200" height="180" onclick="click1(this)" onmouseout="out(this)" onmouseover="over(this)">
</body>
</html>
▼lib.js
function click1(obj){
    obj.src='imgs/banana.jpg'
}
function out(obj){
    obj.src='imgs/apple01.jpg'
}
function over(obj){
    obj.src='imgs/applemango.jpg'
}
3. script 파일 불러오기
2번과 비슷하지만 따로 js 파일을 제작하여 이를 html 파일에 불러오는 식으로 JavaScript 활용
<!DOCTYPE html>
<html>
<head>
    <meta charset='utf-8'>
    <meta name='viewport' content='width=device-width, initial-scale=1'>
    <title>a태그의 href 속성과 같이 url 대신 자바스크립트 코드 작성</title>
</head>
<body>
    <a href="javascript:alert('a 태그의 href 속성을 이용한 자바스크립트 코드 작성')">alert 함수 실행</a>
</body>
</html>
4. a태그의 href 속성과 같이 url 대신 자바스크립트 코드 작성
a 태그의 href 속성 안에 javascript: 를 입력 후 이후에 alert과 같은 함수를 작성하는 것으로 함수를 실행할 수 있다.
<!DOCTYPE html>
<html>
<head>
    <meta charset='utf-8'>
    <meta name='viewport' content='width=device-width, initial-scale=1'>
    <title>document.write()함수 사용 방법</title>
    <script>
        function welcome(){
            document.write("<h3>안녕하세요, 여러분~</h3>");
            document.write("<h4>인공지능 소프트웨어과</h4>");
            document.write("<h3>반갑습니다.</h3>");
        }
    </script>
</head>
<body>
    <h2>document.write()함수</h2>
    <hr>
    <script>
        welcome();
    </script>
</body>
</html>
5. document.write()함수 사용 방법
<script>
function welcome(){
document.write("<h3>안녕하세요, 여러분~</h3>");
document.write("<h4>인공지능 소프트웨어과</h4>");
document.write("<h3>반갑습니다.</h3>");
}
</script>
2번 식으로 welcome()이라는 함수를 제작해 document.write()가 실행되도록 함
document.write("<h3>안녕하세요, 여러분~</h3>"); 을 통해 웹페이지에 h3 태그 형의 문자열 출력
document.write("<h4>인공지능 소프트웨어과</h4>"); 을 통해 웹페이지에 h4 태그 형의 문자열 출력
document.write("<h3>반갑습니다.</h3>"); 을 통해 웹페이지에 h3 태그 형의 문자열 출력
이런 식으로 document.write()에 태그를 이용하여 문자 출력 가능
<!DOCTYPE html>
<html>
<head>
    <meta charset='utf-8'>
    <meta name='viewport' content='width=device-width, initial-scale=1'>
    <title>prompt() 내장함수 : 입력이 가능한 대화상자</title>
    <script>
        function dialogTest1(){
            let result = prompt("성명을 입력해주세요.", "");
            if(result == null){
                alert("취소 또는 닫기 버튼을 클릭하셨습니다.");
            }
            else if(result == ""){
                alert("성명을 입력하지않았습니다.");
            }
            else{
                alert(result + "님 반갑습니다.");
            }
        }

        function dialogTest2(){
            let result = confirm("정말로 삭제하시겠습니까?");
            if(result == true){
                alert("삭제되었습니다.");
            }
            else{
                alert("취소되었습니다.");
            }
        }
    </script>
</head>
<body>
    <h1>prompt함수 호출 시 반환값 종류</h1>
    <h3>1. 취소버튼 또는 닫기버튼 클릭 시 반환값 : null</h3>
    <h3>2. 아무것도 입력되지 않은 상태에서 확인버튼 클릭 시 반환값 : ""(empty string)</h3>
    <h3>3. 값을 입력한 후 확인버튼 클릭 시 반환값 : 입력된 문자열 반환</h3>
    <hr>

    <h1>confirm함수 호출 시 반환값 종류</h1>
    <h3>1. 확인 버튼 클릭 시 반환값 : true</h3>
    <h3>2. 취소 버튼 클릭 시 반환값 : false</h3>
    <hr>

    <form>
        <button type="button" onclick="dialogTest1()">prompt 연습</button><br>
        <button type="button" onclick="dialogTest2()">confirm 연습</button>
    </form>
</body>
</html>
6. prompt() 내장 함수 : 입력이 가능한 대화 상자 + confirm
6-1. prompt

prompt 같은 경우엔 박스안에 텍스트를 입력할 수 있는 빈칸과 확인 버튼, 취소 버튼으로 이루어져 있다.
또한 박스의 내용 같은 경우엔 let result = prompt("성명을 입력해주세요.", "이름"); prompt의 괄호 안에
첫 번째 ""엔 박스 내용이 두 번째 ""엔 텍스트 박스의 내용으로 들어가게 된다.
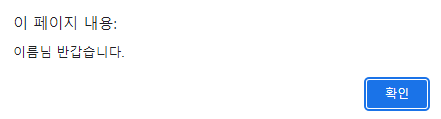
여기서 prompt를 통해 받아진 문자열은 let result = prompt을 통해 result에 저장이 되고
그 result는 alert(result + "님 반갑습니다."); 을 통해서 출력된다.
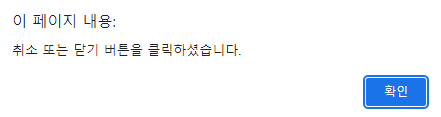
prompt의 취소 버튼을 누르게 되면 result에는 null값이 저장되어 if 함수, if(result == null)에 의해
alert("취소 또는 닫기 버튼을 클릭하셨습니다."); 가 실행된다.

prompt의 텍스트 박스에 아무것도 클릭하지 않고 확인 버튼 클릭 시 result에는 아무것도 저장되지 않아
if 함수, if(result == "")에 의해 alert("성명을 입력하지않았습니다."); 가 실행된다.
6-2. confirm
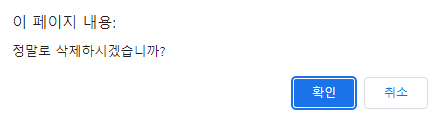
confirm 박스는 확인 버튼과 취소버튼으로 이루어진 박스로 confirm(); 을 통해 만들 수 있고
괄호 안에 큰따옴표를 씌워 작성 시 사진과 같이 페이지의 내용을 넣을 수 있다.
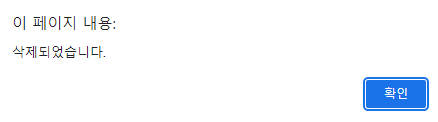
confirm 박스의 확인버튼 클릭 시 confirm은 true 값을 반환하고 이 값은
let result = confirm("정말로 삭제하겠습니까?"); 을 통해 저장이 되어
if 함수, if(result == true) 을 통해 alert("삭제되었습니다."); 가 실행된다.

confirm 박스의 취소 버튼 클릭 시 confirm은 false 값을 반환하고 이 값은
let result = confirm("정말로 삭제하겠습니까?"); 을 통해 저장이 되어
if 함수, if(result == false) 을 통해 alert("취소되었습니다."); 가 실행된다.